
Step-by-step setup · Updated November 2, 2026
Set up GreetAccessibility controls and page checks
Try visitor preferences, install your website toolbar, and combine basic page checks with manual review. Real preview screenshots show what the tools cover and where further testing is needed.
Explore GreetAccessibility features and screenshots or create a free GreetMode account.
1. Try the visitor controls
Open the public preview and choose Accessibility in the bottom-left corner. Try text sizes from 100% through 200%, More text spacing, High contrast, Highlight links, Reduce animation and Simple reading font. Use Reset all preferences to return to the defaults, then Close.
Try the actual GreetAccessibility preview →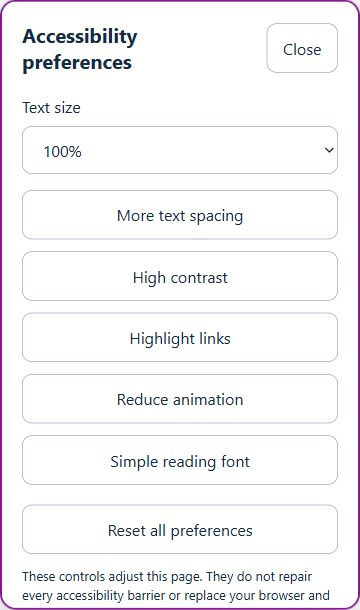
2. Configure and install on your website
Sign in, open Your sites, choose your website, and select GreetAccessibility under Manage products when you have access. Free account creation is separate from paid module activation; check current availability and access in Billing. The public preview does not activate a subscription.
In the dashboard, choose the accent color and bottom-left or bottom-right launcher position. Copy the website-specific script and add it once to the pages you want to support. Use your own site ID, not a demo identifier. Enable visitor toolbar when access permits, then save your accessibility settings.
<script src="https://www.greetmode.com/greetaccessibility.js"
  data-site="your-site-id" defer></script>
Check the published website rather than only the editor preview. Confirm the launcher stays reachable alongside your consent banner and chat bubble. Test every preference and Reset on a phone as well as desktop.
3. Read the basic page checks carefully
In the public preview, choose Run basic page checks. It checks image alt attributes, button name candidates, page language and a primary heading. The screenshot below describes only the demo page, not your website. A missing issue in these checks is not proof that the content is usable.
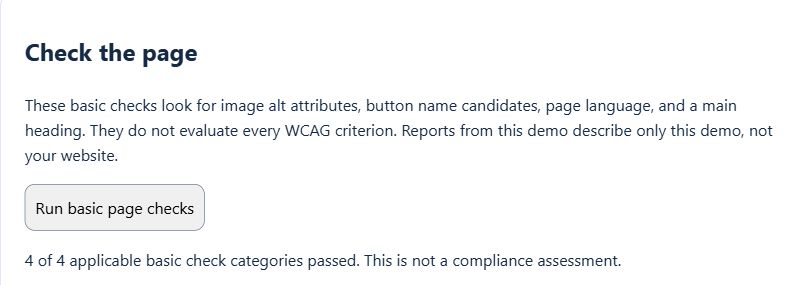
On your own website with GreetAccessibility enabled, a developer can run JSON.stringify(GreetAccessibility.checkPage()) in the browser console. In your website’s dashboard, open Import a page check report, paste the report JSON, and choose Import report. Import updates the draft; Save accessibility settings stores it and calculates the score.
Accessibility health shows the basic automated check score and separate manual review progress. The automated score comes from an owner-imported report for one page and is not independently verified. Even 100/100 does not establish ADA compliance or WCAG conformance. Run checks on other important pages as well.
4. Test real journeys and fix the barriers
- Use only a keyboard to reach menus, forms and the toolbar. Confirm visible focus, useful order, dialog closing and focus return.
- Use your usual screen reader to check names, instructions, errors and successful form messages.
- Review contrast, meaningful image alternatives, media captions, form labels and required fields.
- At 200% text size and narrow phone widths, check that important content and controls remain available.
- Publish accurate accessibility information and a contact method. Record actual manual reviews in the dashboard checklist and save.
Fix issues in the website’s content and code, including third-party content. Visitor preferences assist browsing but do not replace remediation or browser and assistive technology settings.
Technical assistance, not legal advice
GreetAccessibility provides technical tools and general information. It is not legal advice, an ADA compliance certification, a WCAG conformance guarantee or protection from legal claims. Website owners remain responsible for accessibility and remediation. Consult a qualified attorney about legal obligations and an accessibility specialist for a comprehensive evaluation.