
Step-by-step setup · Updated November 2, 2026
Set up GreetMetrics and understand your website reports
See the real connection and disconnected report screens, learn the read-only GA4 setup flow, and understand visitors, visits and tracked outcomes. Google configuration and authorization are required for real data.
Explore GreetMetrics features and screenshots or create a free GreetMode account.
1. Open the free workspace and check connection readiness
Sign in, choose the correct website under Your sites and select GreetMetrics in Manage products. The workspace is free and does not require a paid tool. Open Settings to check the Google connection status.
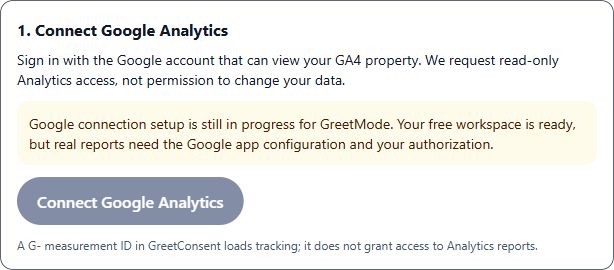
If Google setup is still in progress, real reports cannot load yet. A free workspace does not bypass that requirement. Connections may also be restricted to launch testers. When available to your account, choose Connect Google Analytics, sign in with an account allowed to view the property, and review the read-only Analytics permission request.
GreetMetrics reads reports; it does not install a tracking tag or change visitor consent. Adding a G- measurement ID to GreetConsent controls analytics loading, but does not authorize GreetMode to read your Google reports.
Review consent-managed GA4 tag setup →2. Select this website’s GA4 property when connected
After an available connection succeeds, choose Load my GA4 properties and select the property for this website. Confirm the property carefully: one GA4 property can contain multiple websites or apps. A measurement ID and the reporting property are not interchangeable.
Only confirm ecommerce purchase tracking after checking that it is configured in the selected property. This preference reveals sales reporting; it does not create or validate purchase events. Save reporting preferences to use the selected property.
If the property list is empty or the correct property is missing, check which Google account you authorized and its property permissions. Do not choose an unrelated property just to populate the dashboard.
3. Read the overview, periods and limitations
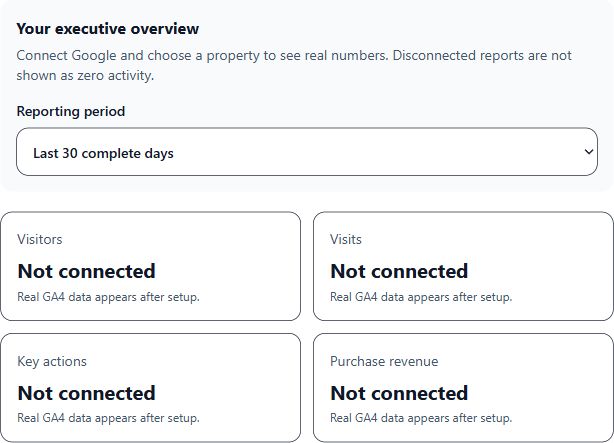
Once a property is connected and a report is available, choose the last 7, 30 or 90 complete days. Check the report dates, property time zone, currency and last-fetched timestamp. Compare with the displayed previous period rather than assuming the figures describe today in real time. Reload report uses a daily cache.
- Visitors: GA4 total users, not a verified count of individual customers.
- Visits: GA4 sessions; one user can have several visits.
- Key actions: events marked as key events in GA4, not automatically confirmed leads or sales.
- Purchase revenue: Google-reported purchase revenue, shown only after ecommerce setup is confirmed. It is not a financial statement or a complete sales record.
Use Visits over time, Where visitors came from and Popular pages to investigate changes. Read warnings alongside the totals. When the prior period is zero, the overview avoids presenting a misleading percentage change. Export overview CSV if you need aggregate results elsewhere, and keep downloads private.
4. Check connection and coverage before drawing conclusions
Not connected, Choose a property and Report unavailable mean different things. Complete the relevant setup or resolve the report error rather than reading any of them as zero visitors. After connection, consent choices, blockers, missing events and Google reporting settings can still affect coverage.
Check the same property and date range in Google Analytics when investigating a discrepancy. Validate tracking on the website separately; GreetMetrics cannot recover visits or purchases that were never recorded. A connection does not make every action a conversion automatically.
Use Reconnect Google when a connection needs attention. Disconnect removes this website’s GreetMetrics connection and cached reports; Google account permissions can also be removed in Google itself. Avoid disconnecting just to refresh a report.
Explore GreetMetrics features and screenshots →